I love to cook with cast iron cookware. My husband and I have been collecting Griswold cast iron since he gave me a #3 skillet for Christmas one year when we were dating (he has always been very practical!). We collected so many skillets over the years that both our children have complete sets from #3 up to #12, along with Dutch ovens.
I like the way cast iron cooks so evenly; if you clean and season them the right way, they are the original non-stick cookware! The Griswold Company of Erie, Pennsylvania, was in production from 1865 to 1957. When we started collecting them you could buy Griswolds at thrift stores and flea markets for a song, but now they are collector’s items and go for a lot more.
Some of my skillets are over 75 years old and still are in great shape. The Lodge Company makes some good skillets and Dutch ovens if you can’t find Griswolds.
If you happen to find cast iron cookware that is rusted — but not pitted — there are ways to bring it back to use. YouTube has videos on how to do this. (Add link to a video). YouTube also is a wonderful resource for learning how to cook with Dutch ovens outdoors.
When we go car camping we always bring along a couple of camp Dutch ovens. Camp Dutch ovens have legs and a flat lid that has an edge on it to hold the charcoal. I have cooked beans, cinnamon rolls, casseroles, cobblers, and even my son’s 16th birthday cake (it was chocolate) in a Dutch. I have had failures — burnt or not cooked enough — but you have to experiment with the heat. There are so many things to consider like altitude, wind, and what you are cooking.
These same recipes can also be made in your oven at home. I like knowing that if the power goes out we have a way to cook nutritious meals with just some briquettes and cast iron.
Make sure you cook this way outside and not inside the house or garage.
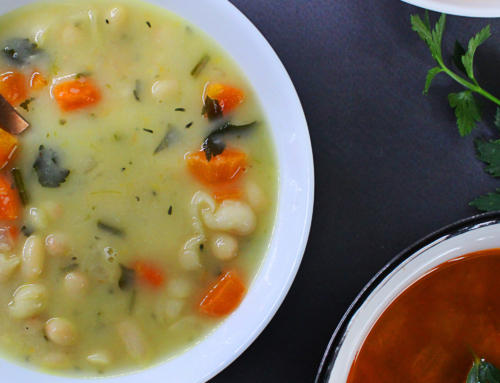
The slow and even heat from the Dutch oven is perfect for this bean recipe. The recipe I adapted is from Sunset magazine. I used dry beans, but the original recipe called for canned. I also changed the cannellini beans to large limas for this recipe. The recipe also says it serves 6, but I’ve found that it yields about a cup per person.
Sausage and Bean Dutch Oven Stew
Use a 4- to 6-quart camp Dutch oven
Ingredients
1 cup dry garbanzo beans
1 cup dry lima beans
1/3 cup olive oil
1 tablespoon chopped fresh rosemary leaves
½ red bell pepper, sliced
½ yellow bell pepper, sliced
1 poblano chile, sliced
4 medium garlic cloves, chopped
1 ½ pounds Italian sausage, cut into 1-inch chunks and cooked
1/8 cup fresh oregano leaves
- Soak the garbanzo beans overnight or for at least 8 hours in a bowl with water, covering up to 3 inches above beans.
- Prepare fire for Dutch oven as directed below.
- Drain the garbanzos and put in the Dutch oven along with the dry lima beans and enough water to cover, plus about an inch more. Cook for about 1 ½ hours or until the beans are soft.
- Add the rest of the ingredients except for the oregano to the beans. Put the lid on the Dutch.
- Arrange coals. I used 7 coals for the bottom and about 15 for the top.
- Check the beans often, about every 10 to 15 minutes, and add water if needed. The beans need to be just covered with water while cooking.
- Once the beans are cooked and the peppers are soft, sprinkle the fresh oregano on top. Serve.
Note: You can use two 15-ounce cans of garbanzos in place of the dried and two 15-ounce cans of cannellini beans in place of the lima beans. If using canned beans, just use ¾ cup of water instead of covering the beans with water and mix all ingredients except the oregano at the start of the recipe.
How to use a Dutch oven, adapted from Sunset magazine:

- Prepare the fire. If you have a campfire going, move any large pieces of still-burning wood to the side and level out your hot coals to fit the size of the Dutch oven. If the campground doesn’t allow wood fires, burn 50 charcoal briquettes until they’re mostly gray, 10 to 15 minutes, and spread into an even layer the size of the Dutch oven.
- Set up the oven. For many recipes, you just set the Dutch oven on top of the hot coals (known as bottom heat cooking). But there are times when you’ll need to heat both the top and bottom of the oven. Just scrape about half the coals to the side and arrange the rest in a circle the size of the Dutch oven’s outer edge. Set the oven on top of the circle of coals, and then pile the rest of the coals on the top of the lid.
- Start cooking. Lift the Dutch oven lid occasionally to check the food and temperature. To decrease the heat, scrape away some fuel. To increase the heat, or to cook longer than 45 minutes, add six to 10 new briquettes or more wood embers (from the still-burning wood you moved to the side of the fire pit) every 30 minutes.

Note: The more briquettes you use, the hotter the oven will get. If you use more check the beans often — you don’t want them to burn!
Enjoy!
-Marilyn